Why modern building codes are banning open vents in humid climates, and how to turn your crawl space into a clean, conditioned zone.
Trusted Sources: This guide aligns with building science standards from Building Science Corporation and The U.S. Department of Energy.
For 100 years, builders followed a simple rule: “Build vents to let the air dry out the crawl space.”
In recent decades, building scientists realized this was a catastrophic mistake. In humid climates, open vents do not let dry air in; they let wet air in, which condenses on cold surfaces, rotting the floor joists from the bottom up.
1. The Physics: The Dew Point Problem
Why does venting fail? It comes down to basic thermodynamics.
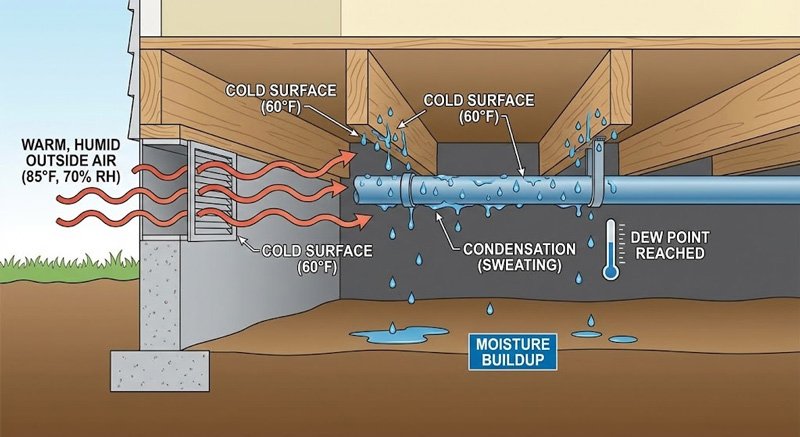
1. Summer Air is Hot and Humid (e.g., 90°F, 80% Humidity).
2. Your Crawl Space is naturally Cool (e.g., 65°F) because it is underground.
3. When that hot air enters the vents and hits the cold wood/pipes, it cools down rapidly.
4. Cool air cannot hold as much water as hot air. It reaches Dew Point and dumps its water load onto your wood framing.
Result: It essentially “rains” inside your crawl space all summer long.
2. Vented vs. Encapsulated
Encapsulation transforms the crawl space from “outside” to “inside” (part of the conditioned building envelope).
| Feature | Old Way (Open Vents) | New Way (Encapsulated) |
|---|---|---|
| Humidity Source | Unlimited (Outside Air) | Controlled |
| Flooring Temp | Cold in Winter | Warmer / Stable |
| Mold Risk | High (Condensation) | Near Zero |
| Pests | Easy Access (Mice/Bugs) | Sealed Out |
3. The 4 Components of Encapsulation
Throwing some plastic on the dirt is NOT encapsulation. A true system requires four specific layers.
Before sealing, you must manage groundwater. A perimeter drain and sump pump ensure no puddles form under the plastic.
Heavy-duty 12-mil to 20-mil reinforced polyethylene plastic. It must run up the walls and be taped at every seam to stop earth moisture.
All foundation vents are permanently blocked with foam board and spray foam. The space is now “closed.”
Since no air enters, you must mechanically dry the air. A commercial-grade dehumidifier keeps RH below 55% year-round.
4. Common DIY Mistakes
We often see homeowners waste thousands on improper installs. Avoid these errors:
“The biggest error I see in DIY jobs is taping the plastic all the way to the top of the wall. You MUST leave a 3-inch gap between the plastic and the wood sill plate. This is the ‘Termite Inspection Gap.’ If you cover it, termites can build mud tubes behind the plastic and destroy your home without you ever seeing them.”
- Using 6-mil Plastic: The thin “painter’s plastic” from hardware stores will tear within 6 months. You need reinforced 12-mil or higher.
- Not Sealing Columns: Every pier and column must be wrapped. Leaving them exposed allows moisture to wick up the concrete (capillary action) into the wood beams.
5. Cost vs. ROI
Professional encapsulation typically costs between $5,000 and $15,000 depending on size and drainage needs.
The Payoff:
- Energy Savings: 15-20% reduction in heating/cooling bills (HVAC doesn’t fight the humid air).
- Air Quality: Elimination of “musty smells” on the first floor.
- Longevity: Protects structural wood from rotting, preventing $50k+ foundation repairs later.